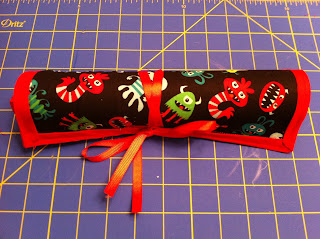
One of the cutest ideas I have seen is the blackboard mat.
Here are a few I have found on some of the blogs I follow:
Both of the sites are loaded with pictures and details on putting a travel blackboard mat together.
I did mine a little different and this is how I put mine together.
 | |||||||
| Travel Blackboard Mat |
1. First I cut Blackboard and Cotton Fabric to 10 x 15. I figured that would be a nice size rectangle.
 |
| Fabric from Joann Fabric and Crafts |
 |
| Blackboard Fabric from Joann Fabric and Crafts |
 |
| Vinyl Pocket |
4. With clips, I placed the monster fabric and blackboard board fabric wrong sides together. I added a folded ribbon under the tape for the tie. Using clips, I lined the bias tape around the mat, using this tutorial Sew To Speak: How To: Attach bias tape (with mitered corners) to miter the corners.
All done!!
 |
| My Biggest Helper |
 | |||||||||
| Travel Blackboard Mat |
Now to make my next one!!


HOW FREEKEN CUTE IS THAT! What a fun idea!!! you could totally sell those what a great car ride idea!!
ReplyDeleteWhat a great idea - never seen these before!
ReplyDeleteThank you!!! They were so easy to make!
ReplyDeleteYour daughter looks JUST like you. Gorgeous. Hope you are well.
ReplyDeleteHeather
OOOH! That is FANTASTIC!!!!!!!!!!!!!!!!
ReplyDeleteHi Tara! Thanks for stopping by! Isn't Anna White the greatest! I want to do all of her projects, LOL! Love this travel mat you did! Just became your 101 follower! Yay!
ReplyDeleteTake care and hope you'll visit again!
xo Jessie
This is a great idea...especially for long car trips and travelling! Although I consider myself a novice sewer, I think this is a great tutorial! Thanks for linking up and sharing with us @ Toot Your Horn Tuesday!
ReplyDeleteErin
This is really neat! I saw one on etsy and wondered how it was made. Thanks for sharing.
ReplyDeletecute tutorial! thanks for the idea :) found your blog via the this little momma link up!
ReplyDeleteThis turned out great and the fabric you chose is so stinkin' cute! Thanks for sharing it with us this week!
ReplyDeleteTake care,
Trish
I've featured you on my facebook page from the "Toot Your Horn" party. Love this project, would love it if you come grab a featured button!!!
ReplyDeleteErin
PERFECT!!!! I love the idea!!! It's a perfect travel companion!!
ReplyDeleteThanks so much for sharing at The DIY Dreamer... From Dream To Reality!
I'm looking forward to seeing what you link up this evening!
Wow! Very cool! If only I was crafty. I have a sewing machine yet can't sew..
ReplyDeleteHopping by your lovely site from the Friday Blog Hop! I'm super late.. LOL
Come check us out too! www.sweepstakesmama.com
Love this!
ReplyDeleteStopping by from the Friday Blog Hop- I'm late =(
Come check us out: www.Sweepstakesmama.com
This comment has been removed by a blog administrator.
ReplyDeleteThanks to share this post.therapy mat is a very good product.
ReplyDeleteI am always looking around the internet/pinterest to find things to make. Coupontoaster Vouchers
ReplyDelete